【トラブルシューティング】”Microsoft Teams” で開催された会議の “レコーディング データ” の保存先を変更する 7 つの手順
- 2021/01/11
- 👁 484 PV
Microsoft が提供する Microsoft 365 の Microsoft Teams 内でチームやチャネルで開催した会議の “レコーディング データ” の保存先を変更する方法のチュートリアルになります。
- ・Microsoft Teams の チームやチャネル内での会議の “レコーディング データ” は、2021 年第 1 四半期から Mirosoft Stream から SharePoint Online または OneDrive for Buisness へと保存されるように変更されました。
- なお、引き続き Mirosoft Stream でレコーディングを行う場合は、Windows PowerShell のコマンドレットにて保存先の設定を変更する必要があります。
- ただし、2021 年 8 月 16 日からは会議ポリシーの “レコーディング データ” の保存先を Mirosoft Stream に変更しても、新しい会議の “レコーディング データ” の保存が行えなくなり、SharePoint Online または OneDrive for Buisness に自動的に保存されるようになります。
※ PineApple では記事内リンクからアフィリエイト報酬を得ることで当サイトの運営および維持を行っておりますため、ご協力いただけますと幸いです。
チームやチャネルで開催した会議の “レコーディング データ” の保存先を確認する方法【Windows 11】
現在の Microsoft Teams の “レコーディング データ” の保存先を確認するには、Microsoft Teams PowerShell モジュールを導入し、Microsoft Teams へ接続する必要があります。
- ・すでに Microsoft Teams PowerShell モジュールのインストールを行っている場合はインストールは不要です。
- ・現在の Microsoft Teams の “レコーディング データ” の保存先変更方法は、こちらを参照してください。
- ※ 【トラブルシューティング】”Microsoft Teams” で開催された会議の “レコーディング データ” の保存先の変更方法
1. “検索するには、ここに入力します” 内に “Windows PowerShell” を入力
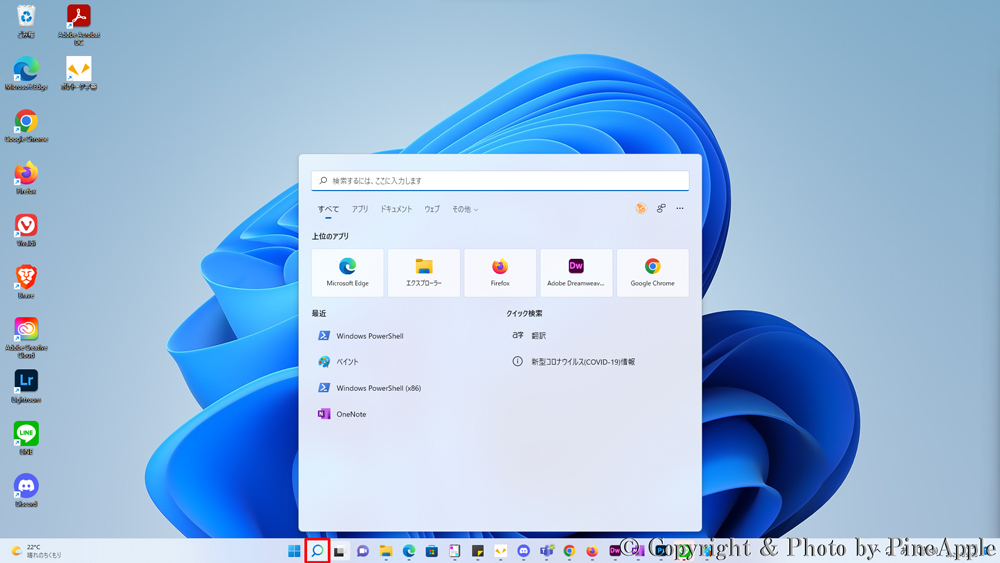 Windows 11:タスク バー内の検索アイコンをクリックし、”検索するには、ここに入力します” 内に “Windows PowerShell” を入力
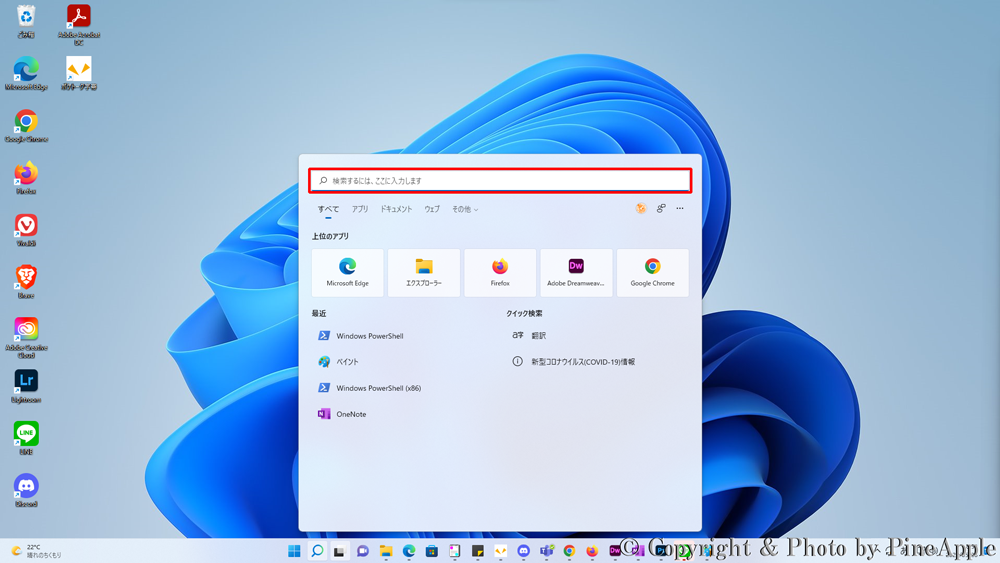 Windows 11:タスク バー内の検索アイコンをクリックし、”検索するには、ここに入力します” 内に “Windows PowerShell” を入力
タスク バー内の検索アイコンをクリックし、”検索するには、ここに入力します” 内に “Windows PowerShell” を入力します。
2. “最も一致する検索結果” 内から [Windows PowerShell(x86)] をクリックし、[管理者として実行] をクリック
![Windows 11:"最も一致する検索結果" 内から [Windows PowerShell(x86)] をクリックし、[管理者として実行] をクリック](https://pine-app1e.com/wp-content/uploads/2022/05/IMG_4381.png) Windows 11:”最も一致する検索結果” 内から [Windows PowerShell(x86)] をクリックし、[管理者として実行] をクリック
Windows 11:”最も一致する検索結果” 内から [Windows PowerShell(x86)] をクリックし、[管理者として実行] をクリック
“最も一致する検索結果” 内から [Windows PowerShell(x86)] をクリックし、[管理者として実行] をクリックします。
3. “このアプリがデバイスに変更を加えることを許可しますか?” のメッセージが表示された場合、[はい] をクリック
“このアプリがデバイスに変更を加えることを許可しますか?” のメッセージが表示された場合、[はい] をクリックします。
- Windows PowerShell
- 確認済みの発行元:Microsoft Windows
4. “Microsoft Teams PowerShell モージュール” をインストール
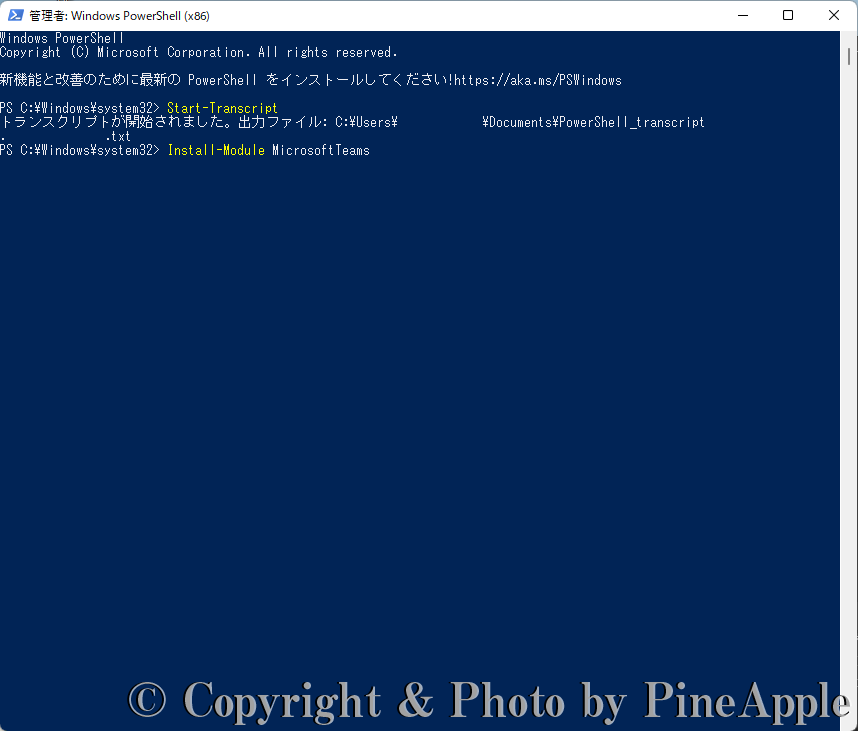 Windows PowerShell:”Install-Module MicrosoftTeams” のコマンドレットを入力し、実行
Windows PowerShell に “Install-Module MicrosoftTeams” コマンドレットを入力し、[Enter] キーを押し、”Microsoft Teams PowerShell モジュール” をインストールします。
![Windows PowerShell:"続行するには NuGet プロバイダーが必要です。" のメッセージが表示された場合、キーボードの [Y] を入力し、[Enter] キーをします。](https://pine-app1e.com/wp-content/uploads/2022/05/IMG_4383.png) Windows PowerShell:”続行するには NuGet プロバイダーが必要です。” のメッセージが表示された場合、キーボードの [Y] を入力し、[Enter] キーをします。
Windows PowerShell:”続行するには NuGet プロバイダーが必要です。” のメッセージが表示された場合、キーボードの [Y] を入力し、[Enter] キーをします。
“続行するには NuGet プロバイダーが必要です。” のメッセージが表示された場合、キーボードの [Y] を入力し、[Enter] キーをします。
- 続行するには NuGet プロバイダーが必要です。
- PowerShellGet で NuGet ベースのリポジトリを操作するには、’2.8.5.201′ 以降のバージョンの NuGet プロバイダーが必要です。
- NuGet プロバイダーは、’C:\Program Files(x86)\PackageManagement\ProviderAssemblies’ または ‘C:\Users\AppData\Local\PackageManagement\ProviderAssemblies’ に配置する必要があります。
- ’Install-PackageProvider -Name NuGet -MinimumVersion 2.8.5.201 -Force’ を実行して NuGet プロバイダーをインストールしてインポートしますか?
- [Y] はい(Y) [N] いいえ(N) [S] 中断(S) [?] ヘルプ(既定値は “Y”):
![Windows PowerShell:"信頼されていないリポジトリ" のメッセージが表示された場合、[Y] または [A] を入力し、[Enter] キーを押します。](https://pine-app1e.com/wp-content/uploads/2022/05/IMG_4384.png) Windows PowerShell:”信頼されていないリポジトリ” のメッセージが表示された場合、[Y] または [A] を入力し、[Enter] キーを押します。
Windows PowerShell:”信頼されていないリポジトリ” のメッセージが表示された場合、[Y] または [A] を入力し、[Enter] キーを押します。
※ PSGallery(PowerShell ギャラリー)が、PowerShellGet の信頼済みリポジトリとして構成されていない場合、PSGallery(PowerShell ギャラリー)を使用すると、上記のメッセージが表示されます。
“信頼されていないリポジトリ” のメッセージが表示された場合、[Y] または [A] を入力し、[Enter] キーを押します。
- 信頼されていないリポジトリ
- 信頼されていないリポジトリからモジュールをインストールしようとしています。
- このリポジトリを信頼する場合は、Set-RSRepository コマンドレットを実行して、リポジトリの InstallationPolicy の値を変更してください。
- ‘PSGallery’ からモジュールをインストールしますか?
- [Y] はい(Y) [A] 全て続行(A) [N] いいえ(N) [L] すべて無視(L) [S] 中断(S) [?] ヘルプ(既定値は “N”):
なお、”信頼されていないリポジトリ” のメッセージの画面で、[Y] を入力後、以下のエラー メッセージが表示される場合は後述するコマンドレットを入力し、[Enter] キーを押します。
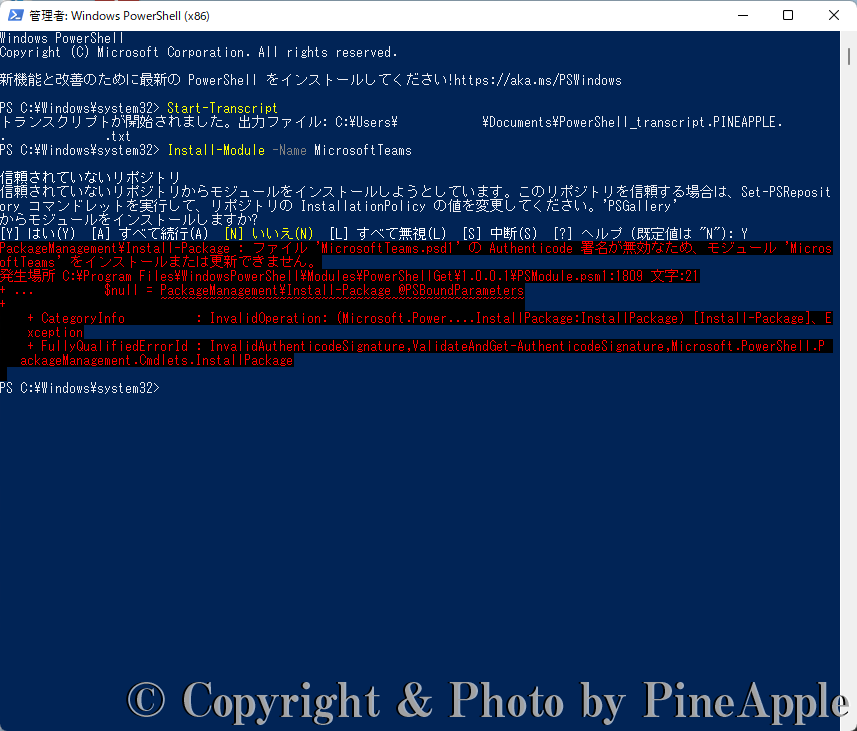 Windows PowerShell:PackageManagement\Install-Package : ファイル ‘MicrosoftTeams.psd1’ の Authenticode 署名が無効なため、モジュール ‘MicrosoftTeams’ をインストールまたは更新できません。
- PackageManagement\Install-Package : ファイル ‘MicrosoftTeams.psd1’ の Authenticode 署名が無効なため、モジュール ‘MicrosoftTeams’ をインストールまたは更新できません。
- 発生場所 C:\Program Files\WindowsPowerShell\Modules\PowerShellGet\1.0.0.1\PSModule.psm1:1809 文字:21
- + … $null = PackageManagement\Install-Package @PSBoundParameters
- + ~~~~~~~~~~~~~~~~~~~~~~~~~~~~~~~~~~~~~~~~~~~~~~~~~~~~
- [Y] はい(Y) [A] 全て続行(A) [N] いいえ(N) [L] すべて無視(L) [S] 中断(S) [?] ヘルプ(既定値は “N”):
- + CategoryInfo : InvalidOperation: (Microsoft.Power….InstallPackage:InstallPackage) [Install-Package]、Exception
- + FullyQualifiedErrorId : InvalidAuthenticodeSignature,ValidateAndGet-AuthenticodeSignature,Microsoft.PowerShell.PackageManagement.Cmdlets.InstallPackage
![Windows PowerShell:"Install-Module -Name MicrosoftTeams -Force -AllowClobber -SkipPublisherChec" コマンドレットを入力し、[Enter] キーを押し、"Microsoft Teams PowerShell モジュール" をインストールします。](https://pine-app1e.com/wp-content/uploads/2022/05/IMG_4386.png) Windows PowerShell:”Install-Module -Name MicrosoftTeams -Force -AllowClobber -SkipPublisherChec” コマンドレットを入力し、[Enter] キーを押し、”Microsoft Teams PowerShell モジュール” をインストールします。
Windows PowerShell:”Install-Module -Name MicrosoftTeams -Force -AllowClobber -SkipPublisherChec” コマンドレットを入力し、[Enter] キーを押し、”Microsoft Teams PowerShell モジュール” をインストールします。
Windows PowerShell に “Install-Module -Name MicrosoftTeams -Force -AllowClobber -SkipPublisherChec” コマンドレットを入力し、[Enter] キーを押し、”Microsoft Teams PowerShell モジュール” をインストールします。
![Windows PowerShell:Import-Module MicrosoftTeams" コマンドレットを入力し、[Enter] キーを押し、Microsoft Teams をインストールします。](https://pine-app1e.com/wp-content/uploads/2022/05/IMG_4387.png) Windows PowerShell:Import-Module MicrosoftTeams” コマンドレットを入力し、[Enter] キーを押し、Microsoft Teams をインストールします。
Windows PowerShell:Import-Module MicrosoftTeams” コマンドレットを入力し、[Enter] キーを押し、Microsoft Teams をインストールします。
“Microsoft Teams PowerShell モージュール” のインストールの完了後、”Import-Module MicrosoftTeams” コマンドレットを入力し、[Enter] キーを押し、Microsoft Teams をインポートします。
5. “レコーディング データ” の保存先の確認方法
![Windows PowerShell :"Connect-MicrosoftTeams" コマンドレットを入力し、[Enter] キーを押し、Microsoft Teams に接続します。](https://pine-app1e.com/wp-content/uploads/2022/05/IMG_4388.png) Windows PowerShell :”Connect-MicrosoftTeams” コマンドレットを入力し、[Enter] キーを押し、Microsoft Teams に接続します。
Windows PowerShell :”Connect-MicrosoftTeams” コマンドレットを入力し、[Enter] キーを押し、Microsoft Teams に接続します。
Windows PowerShell に “Connect-MicrosoftTeams” コマンドレットを入力し、[Enter] キーを押し、Microsoft Teams に接続します。
グローバル管理者の UPN(メール アドレス)と PW(パスワード)を入力します。
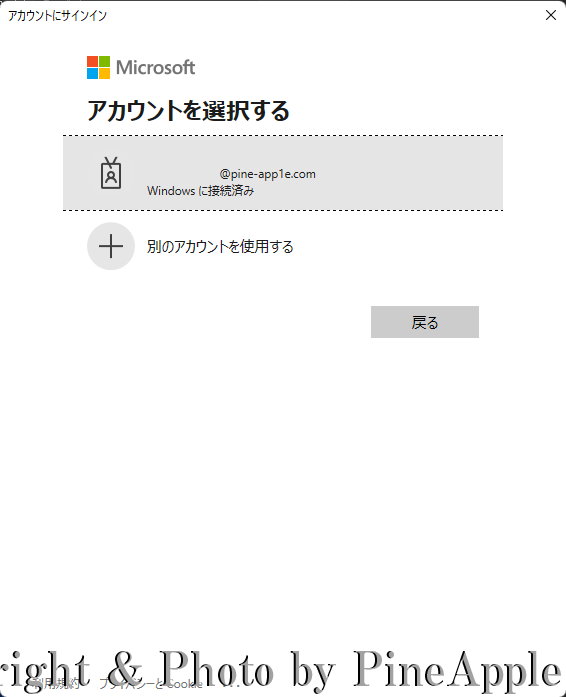 アカウントにサインイン:”アカウントを選択する” セクション内に該当のグローバル管理者のアカウントが表示されている場合は、該当アカウントをクリックします。
※ “アカウントにサインイン” 画面の “アカウントを選択する” セクション内に該当のグローバル管理者のアカウントが表示されている場合は、該当アカウントをクリックします。
- アカウントを選択する
- []
- *****@contoso.com
- Windows に接続済み
- [+ 別のアカウントを使用する]
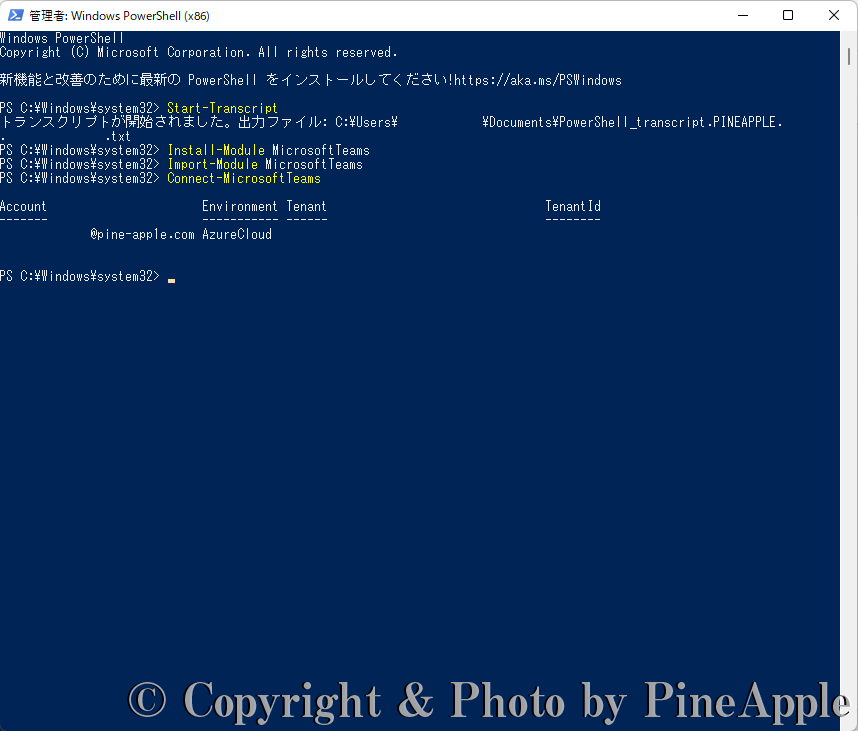 Windows PowerShell:Microsoft Teams への接続が行えると以下の “Account”、”Environment”、”Tenant”、”TenantId” が返されます。
Microsoft Teams への接続が行えると以下の “Account”、”Environment”、”Tenant”、”TenantId” が返されます。
- Account
- ——-
- *****@contoso.com
- Environment
- ———–
- AzureCloud
- Tenant
- ——
- *******-****-****-****-************
- TenantId
- ——–
- *******-****-****-****-************
“Get-CsTeamsMeetingPolicy -Identity “確認するポリシー名” | Select RecordingStorageMode” を入力し、[Enter] キーを押し、保存先の結果を確認します。
※ 会議ポリシーが “グローバル(組織全体の設定値)” の場合は以下になります。
“Get-CsTeamsMeetingPolicy -Identity Global | Select RecordingStorageMode”
- RecordingStorageMode
- ——————–
- OneDriveForBusiness
- RecordingStorageMode
- ——————–
- Stream
6. “レコーディング データ” の保存先の変更方法
![Windows PowerShell:"Set-CsTeamsMeetingPolicy -Identity "レコーディング データの保存先を変更する会議ポリシー名" | Select RecordingStorageMode" を入力し、[Enter] キーを押し、該当会議ポリシーの "レコーディング データ" の保存先を変更](https://pine-app1e.com/wp-content/uploads/2022/05/IMG_4393.png) Windows PowerShell:”Set-CsTeamsMeetingPolicy -Identity “レコーディング データの保存先を変更する会議ポリシー名” | Select RecordingStorageMode” を入力し、[Enter] キーを押し、該当会議ポリシーの “レコーディング データ” の保存先を変更
Windows PowerShell:”Set-CsTeamsMeetingPolicy -Identity “レコーディング データの保存先を変更する会議ポリシー名” | Select RecordingStorageMode” を入力し、[Enter] キーを押し、該当会議ポリシーの “レコーディング データ” の保存先を変更
“Set-CsTeamsMeetingPolicy -Identity “レコーディング データの保存先を変更する会議ポリシー名” | Select RecordingStorageMode “保存先”” を入力し、[Enter] キーを押し、該当会議ポリシーの “レコーディング データ” の保存先を変更します。
※ 会議ポリシーが “グローバル(組織全体の設定値)” の場合は以下になります。
“Set-CsTeamsMeetingPolicy -Identity “Global” | Select RecordingStorageMode “保存先”
上記コマンドレットを実行すると、以下の値が返されます。
- RecordingStorageMode
- ——————–
- OneDriveForBusiness
- RecordingStorageMode
- ——————–
- Stream
7. 変更後の “レコーディング データ” の保存先の確認方法
![Windows PowerShell:"Get-CsTeamsMeetingPolicy -Identity "確認するポリシー名" | Select RecordingStorageMode" を入力し、[Enter] キーを押し、保存先の結果を確認](https://pine-app1e.com/wp-content/uploads/2022/05/IMG_4394.png) Windows PowerShell:”Get-CsTeamsMeetingPolicy -Identity “確認するポリシー名” | Select RecordingStorageMode” を入力し、[Enter] キーを押し、保存先の結果を確認
Windows PowerShell:”Get-CsTeamsMeetingPolicy -Identity “確認するポリシー名” | Select RecordingStorageMode” を入力し、[Enter] キーを押し、保存先の結果を確認
“Get-CsTeamsMeetingPolicy -Identity “確認するポリシー名” | Select RecordingStorageMode” を入力し、[Enter] キーを押し、保存先の結果を確認します。
※ 会議ポリシーが “グローバル(組織全体の設定値)” の場合は以下になります。
“Get-CsTeamsMeetingPolicy -Identity Global | Select RecordingStorageMode”
- RecordingStorageMode
- ——————–
- OneDriveForBusiness
- RecordingStorageMode
- ——————–
- Stream
Microsoft Teams: meeting recordings saved to OneDrive and SharePoint – MC222640
- We’re changing the storage for new Teams meeting recordings to be stored on, and served from, OneDrive and SharePoint (ODSP) – instead of Microsoft Stream (Classic).
- Customers are able to opt in, opt out, or take no action with regard to these changes.
- This change will apply to customers who either opt in or take no action following this announcement.
- ・Key points :
- ・Microsoft 365 Roadmap ID: 67138
- ・Timing:
- October 19, 2020 (Complete) – You can enable the Teams Meeting policy to have meeting recordings saved to OneDrive and SharePoint instead of Microsoft Stream (Classic)
- Rolling out starting January 7th, 2021 (Updated) – All new Teams meeting recordings will be saved to OneDrive and SharePoint unless you delay this change by modifying your organization’s Teams Meeting policies and explicitly setting them to “Stream”.
- Seeing the policy reporting as Stream is not enough.
- You need to explicitly set the policy value to “Stream”.
- Rolling out starting March 1st, 2021 to Enterprise Customers (Updated) – No new meeting recordings can be saved to Microsoft Stream (Classic); all customers will automatically have meeting recordings saved to OneDrive and SharePoint even if they’ve changed their Teams meeting policies to “Stream”.
- We recommend that customers roll this feature out before this date so that they can control the timing of the release.
- Rolling out starting July 7th, 2021 to Education Customers (Updated) – No new meeting recordings can be saved to Microsoft Stream (Classic); all customers will automatically have meeting recordings saved to OneDrive and SharePoint even if they’ve changed their Teams meeting policies to “Stream”.
- We recommend that customers roll this feature out before this date so that they can control the timing of the release.
- We have updated this schedule to provide education customers the ability to complete in progress semesters.
- ・Rollout : Tenant level
- ・Control : Admin via PowerShell
- How this will affect your organization :
- This change impacts your organization in several ways :
- ・New features
- The move to ODSP immediately unlocks long-awaited features including external and guest sharing, retention policy application (https://docs.microsoft.com/microsoft-365/compliance/apply-retention-labels-automatically), GoLocal support, and BYOK support for customers.
- Improved transcription quality, speaker attribution, transcript content search, and other features to follow in CY2021.
- ・Meeting storage
- Non-Channel meetings will be stored in the OneDrive of the person who clicked the record button in a special folder labeled “Recordings” – that sits at the top of the recorder’s OneDrive.
- Channel meetings will be stored in a folder labeled “Recordings” under a folder named after the channel under the Team’s document library.
- Customers using A1 licenses and saving meeting recordings to OneDrive and SharePoint will have an automatic 30-day expiration set on meeting recordings later in 2021.
- Additional communications to follow.
- ・Permissions
- All meeting invitees – except for external users – in non-channel meetings will automatically get a shared link to access the meeting recording.
- External users will need to be explicitly added to the shared list by the meeting organizer or the person that clicked the record button.
- For Channel meetings, permissions will be inherited from the owners and members list in the channel.
- ・Feature gaps
- The following gaps exist today :
- Ability to block download of the video by meeting participants
- Ability to view and edit the transcript in the player.
- Non-English language transcripts/captions
- Variable playback speed in video player
- Transcript timeframe search (e.g., to find a specific point in time when something was discussed)
- What you need to do to prepare :
- Customers are able to opt in, opt out, or take no action with regard to these changes.
- Changes in this communication will apply to customers who either opt in or take no action.
- Tenant admins can opt in or opt out of OneDrive and SharePoint as the Teams meeting recording storage location via a Teams policy in PowerShell.
- Additionally, customers who wish to have captions for their meetings will need to enable transcript recording in Teams.
- Learn more : Use OneDrive for Business and SharePoint or Stream for meeting recordings
Microsoft Teams とは?
Microsoft Teams は、Microsoft の提供するコラボレーション ツールになります。
Microsoft Teams 関連記事一覧
- ・【アップデート情報】”Microsoft Teams 2.x 〜” の更新履歴まとめ
- ・【アップデート情報】”Microsoft Teams 3.x 〜” の更新履歴まとめ
- ・【Microsoft Teams】”Microsoft Teams” とは?
- ・【トラブルシューティング】”Microsoft Teams” のハードウェア要件について
- ・【トラブルシューティング】”Microsoft Teams” にサインインする方法【Windows 編】
- ・【トラブルシューティング】”Microsoft Teams” のキャッシュの削除と再インストール【Windows】
- ・【トラブルシューティング】Microsoft Teams のキャッシュの削除と再インストール【Windows】
- ・【トラブルシューティング】”Microsoft Teams” のキャッシュの削除と再インストール方法【Android】
- ・【トラブルシューティング】”Microsoft Teams PowerShell モジュール” をインストールする方法
- 【トラブルシューティング】”Microsoft Teams” で開催された会議の “レコーディング データ” の保存先を確認する 5 つの手順
- ・【トラブルシューティング】”Microsoft Teams PowerShell モジュール” をインストールする方法
- ・【トラブルシューティング】”Microsoft Teams” で開催された会議の “レコーディング データ” の保存先を確認する 5 つの手順
- ・【トラブルシューティング】”Microssoft Teams” のスタートアップ起動を “オフ” にする方法【Windows 10】
- ・【トラブルシューティング】”Microsoft Teams” にサインインする方法【iOS 編】
- ・【トラブルシューティング】”Teams にアクセス許可が必要です” が表示された時の 4 つの手順とは?【iOS 15】
- ・【トラブルシューティング】”Microsoft Teams” の [チャネル] 会議の操作方法【iOS 編】
- ・【トラブルシューティング】”Microsoft Teams” のキャッシュの削除と再インストール方法【Android】
- ・【トラブルシューティング】メールでチャネル メッセージ投稿できる!投稿方法と注意点
関連リンク
- ・Record a meeting in Teams:https://support.microsoft.com/ja-jp/office/34dfbe7f-b07d-4a27-b4c6-de62f1348c24
- ・Use OneDrive for Business and SharePoint or Stream for meeting recordings – Microsoft Teams|Microsoft Docs:https://docs.microsoft.com/ja-jp/microsoftteams/tmr-meeting-recording-change
- ・About Execution Policies – PowerShell|Microsoft Docs:https://docs.microsoft.com/ja-jp/powershell/module/microsoft.powershell.core/about/about_execution_policies
- ・Install Microsoft Teams PowerShell Module:https://docs.microsoft.com/ja-jp/microsoftteams/teams-powershell-install
- ・Microsoft Teams PowerShell Overview – Microsoft Teams|Microsoft Docs:https://docs.microsoft.com/ja-jp/microsoftteams/teams-powershell-overview
- ・Microsoft Teams PowerShell Release Notes – Microsoft Teams|Microsoft Docs:https://docs.microsoft.com/ja-jp/microsoftteams/teams-powershell-release-notes
- ・Microsoft 365 ロードマップ|Microsoft 365:https://www.microsoft.com/microsoft-365/roadmap?filters=&featureid=67138
- ・Microsoft 365 ロードマップ|Microsoft 365:https://www.microsoft.com/ja-jp/microsoft-365/roadmap
- ・Skype for Business Online PowerShell の導入について – マイクロソフト コミュ
ニティ:https://answers.microsoft.com/wiki/54f64801-05bf-4c11-9e65-bdb61a3efe97 - ・Download Windows PowerShell Module for Skype for Business Online from Official Microsoft Download Center:https://www.microsoft.com/ja-JP/download/details.aspx?id=39366
- ・Microsoft Teams|リモート ワークのためのコラボレーション ツール:https://www.microsoft.com/ja-jp/microsoft-365/microsoft-teams/group-chat-software
- ・Microsoft Stream|大企業向けビデオ オンデマンドとライブ ストリーミング:https://www.microsoft.com/ja-jp/microsoft-365/microsoft-stream
- ・Microsoft SharePoint|イントラネットとコラボレーション ソリューション:https://www.microsoft.com/ja-jp/microsoft-365/sharepoint/collaboration
- ・OneDrive for Business|安全なクラウド ストレージ|クラウド バックアップ:https://www.microsoft.com/ja-jp/microsoft-365/onedrive/onedrive-for-business
- ・日本マイクロソフト – Official Home Page:https://www.microsoft.com/ja-jp

















コメントはまだありません